What is Connected Banking in TallyPrime?
With TallyPrime Release 6.0, Connected Banking makes banking tasks effortless. Now, you can access your bank statements and bank balance directly from TallyPrime, saving valuable time and focusing on core business operations.
Getting Started with Connected Banking
To enable Connected Banking, ensure you have:
Active TallyPrime license
Valid TSS (Tally Software Services) subscription
Tally.NET ID or registered email address
10-digit mobile number for OTP verification
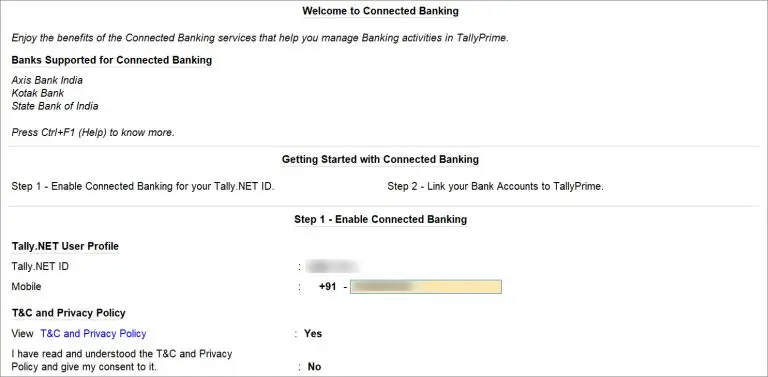
Log In or Register for Connected Banking
When you log in for the first time using an Account Administrator Tally.NET ID, you will need to link your mobile number. Moreover, you will need to change your password, if it does not comply with the new password policy.
One -Time Setup for Connected Banking
Before using Connected Banking, complete these steps:
Link your mobile number with Tally.NET ID
Change password if it doesn’t meet the new password policy
How to Link a Mobile Number to Tally.NET ID?
Enter the mobile number you want to link
Accept Terms & Conditions and Privacy Policy
Verify OTP received on your mobile number
Once verified, the number gets linked, and you’re ready to use Connected Banking
Updating Your Mobile Number for Connected Banking
To update your mobile number via the Tally Solutions Customer Portal:
Log in to the Tally Solutions Portal
Go to "MY PROFILE"
Edit the mobile number under "Connected Banking Services"
Verify OTP and confirm the update
Changing Password for Connected Banking
TallyPrime enforces a secure password policy for Connected Banking. Your password must:
Be 6-10 digit PIN OR
Have at least 8 characters, including uppercase, lowercase, a number, and a special character
Steps to Change Password in TallyPrime
Enter the Old Password
Set a New Password & Confirm it
Press Enter – Password gets updated successfully
Logging in to Connected Banking for Non-Admin Users
For multi-user licenses, an admin must approve Connected Banking access:
Press Alt+Z (Exchange) > All Banking Options > Login & Logout
Enter Tally.NET ID
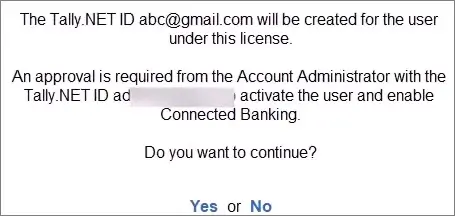
If non-admin, request approval
Admin enters credentials to approve access
User can now log in and use Connected Banking
Log Out from Connected Banking In TallyPrime
To ensure the security of your banking session, it’s essential to log out when you're done using Connected Banking. Here’s how to do it:
Press Alt+Z (Exchange) > All Banking Options > Login & Logout
Press Y to log out from Connected Banking
Logging out ensures your session remains secure and prevents unauthorized access.
Resetting the Connected Banking Login
If you are unable to log out or facing login issues with Connected Banking, you can reset your login details. Follow these steps:
Press F1 (Troubleshooting) > Reset Connected Banking Login
Press Enter to confirm
Press Y to reset and confirm the action
This process helps you resolve login-related issues and regain access to the Connected Banking services.
Connect Your Bank Accounts for Connected Banking
Connecting your bank accounts to TallyPrime allows you to access bank statements and bank balances directly from the software. This connection process may vary depending on the bank you use.
How to Connect Bank Accounts in TallyPrime
To link your bank accounts, follow these simple steps:
Press Alt+Z (Exchange) > All Banking Options > Bank Connections
If you haven’t already logged in, you’ll need to log in to Connected Banking
Press F6 (New Connection) to initiate the bank connection
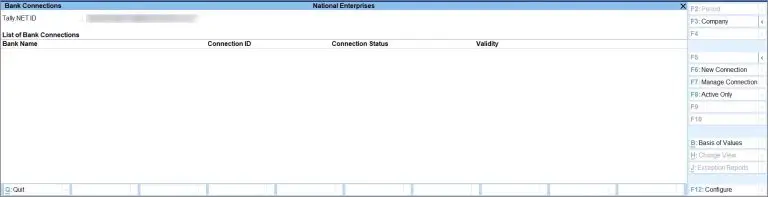
Select the relevant bank from the list of available options
If any connections are pending approval for that bank, you will see a message. Press Y to proceed
A Connection ID will be generated, which acts as a reference for the bank connection initiated.
Confirming the Connection
In the Connect to Bank screen, press C (Connect).
This will redirect you to the respective bank's portal.
Once you establish the connection on the bank portal, you can refresh the connection status:
Press R (Refresh Status) to check if the connection is successfully established.
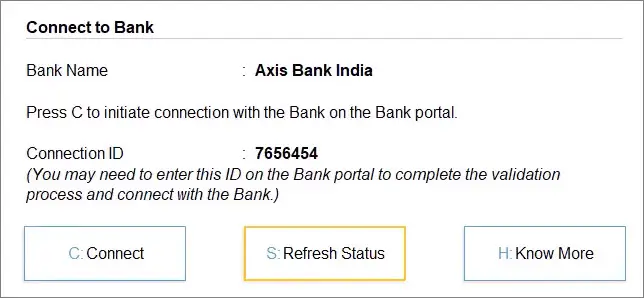
The status of your connection will be displayed as Connected in the Bank Connections report.
Viewing Linked Bank Accounts
Once your connection is established, you will see the linked bank accounts and, if applicable, the corresponding bank ledgers.
To view your linked accounts:
Press Shift+Enter on the relevant bank row in the Bank Connections section.

This process ensures that all your bank accounts are successfully linked and ready for Connected Banking services in TallyPrime.
Manage Your Bank Connections in TallyPrime
TallyPrime allows you to easily manage your bank connections, giving you the flexibility to reconnect or disconnect your bank accounts as needed.
How to Reconnect a Bank Account in TallyPrime
If your bank connection is interrupted or needs re-establishing, you can reconnect using the existing Connection ID. This is particularly useful in the following scenarios:
Connection is still in progress
Connection has expired due to:
Expiry of connection validity
Change in mobile number linked to the bank
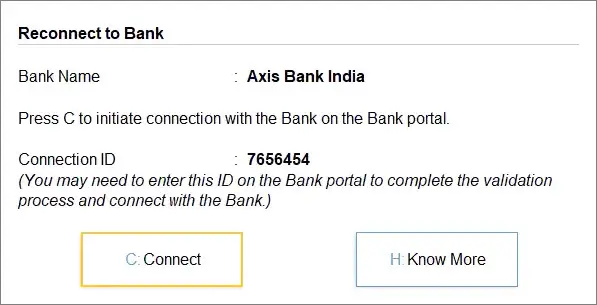
Here’s how to reconnect:
Select the bank connection and press Enter or F7 (Manage Connection).
In the Manage Connection screen, press F6 (Reconnect to Bank).
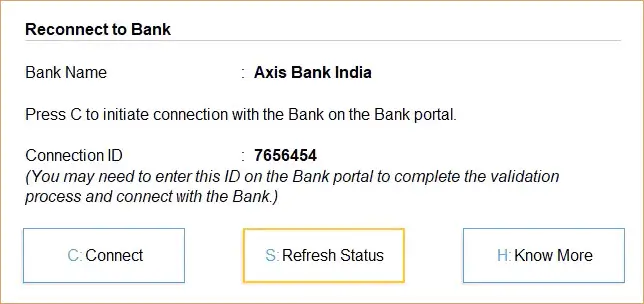
In the Reconnect to Bank screen, press C (Connect).
You will be redirected to the bank portal for reconnection.
After successfully reconnecting, you can refresh the connection status by pressing R (Refresh Status). The connection status will be displayed as Connected.
How to Disconnect a Bank Account in TallyPrime
If you no longer wish to use a specific bank account through Connected Banking, you can easily disconnect it. This is useful for dormant bank accounts or when you want to stop using a particular connection.
Follow these steps to disconnect:
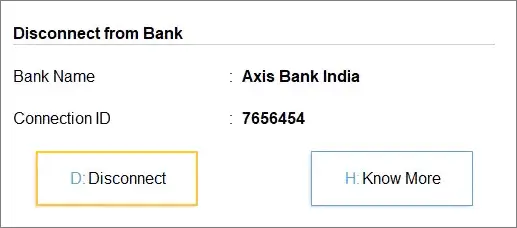
In the Manage Connection screen, press Alt+F6 (Disconnect).
In the Disconnect from Bank screen, press D (Disconnect).
Confirm by pressing Y to disconnect.
Important Note:
For some banks, such as Axis Bank, you’ll be required to enter an OTP received on the mobile number linked to the bank account before successfully disconnecting.
Manage User Access to Bank Accounts
When managing bank accounts in TallyPrime, it’s essential to control user access. If your bank system involves user approvals, you will see a list of users in the Manage Connection screen, allowing you to grant or restrict access as necessary.
How to Approve User Access to Bank Accounts
If you are an admin or have the required permissions, you can approve user access to connected bank accounts. This is important when users are waiting for approval.
Follow these steps to approve access:
In the Bank Connections report, press F7 (Manage Connection).
Select the user whose access is pending.
Press F8 (Approve Access).
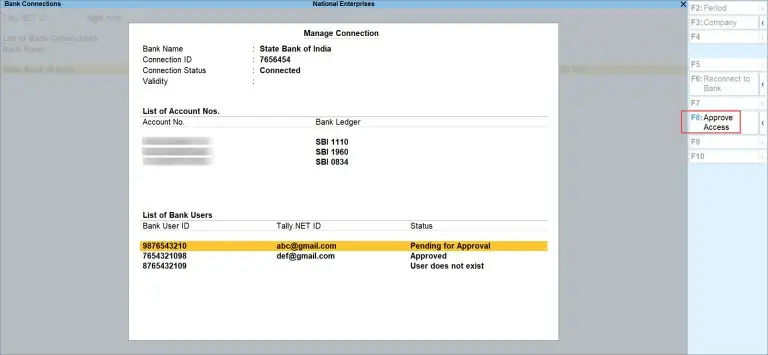
Press Y to confirm.
Once approved, the user will be able to access the Connected Banking services.
How to Disable User Access to Bank Accounts
If you want to restrict access for certain users, you can disable their bank access at any time. This is useful when a user no longer needs access to Connected Banking.
Here’s how to disable access:
In the Bank Connections report, press F7 (Manage Connection).
Select the user and press Alt+F8 (Disable Access).
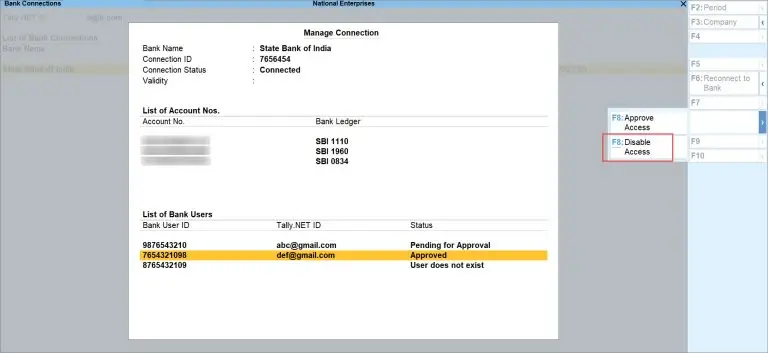
Press Y to confirm.
Disabling access ensures that the user will no longer be able to access Connected Banking services.
User Status Considerations
If a user shows the status "User does not exist", it may be due to one of the following reasons:
The user has not linked their mobile number.
The user does not have a Tally.NET ID.
In such cases, make sure to complete the necessary steps to link the user’s mobile number and create or activate their Tally.NET ID.
Get And Import Bank Statements
With Connected Banking in TallyPrime, you can effortlessly retrieve bank statements and use them to reconcile transactions in your books, saving time and improving accuracy.
How to Get Bank Statements in TallyPrime
To get your bank statement directly in TallyPrime, follow these simple steps:
Press Alt+Z (Exchange) > Get Statement.
Set the period for which you want to retrieve the statement.
Select the bank ledger and press Alt+S (Set Statement Period).
Enter the From and To dates, then press Enter.
Press S (Get Statement) to retrieve the statement.
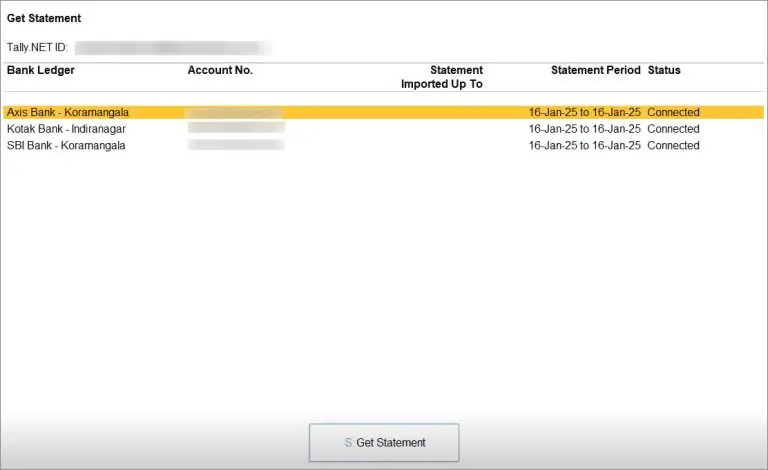
Import Bank Statement into TallyPrime
Once the request for the statement is processed by the bank, you can import the statement directly into TallyPrime.
Follow these steps to import your bank statement:
Select the request that is ready for import.
Press S to import the statement.
The statement becomes a part of your Company data and is available for viewing in the Imported Bank Data and Bank Reconciliation reports.
If you’re not using Connected Banking, you can still import bank statements for auto reconciliation.
Delete Bank Statement Request
If you’ve requested a statement for the wrong period, you can delete the request. To delete the statement request:
Bring the cursor to the request.
Press Alt+R (Delete Request).
Press Y to confirm.
The request will be deleted and no longer appear in your system.
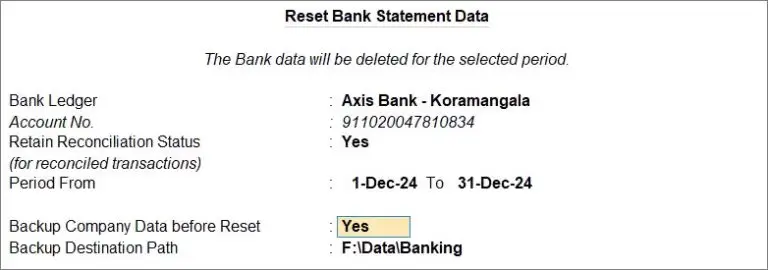
Reset Bank Statement Data in TallyPrime
In cases where you’ve imported a statement for the wrong period or no longer need it after reconciling transactions, you can reset the bank statement data.
Here’s how to reset:
Press F1 (Help) > Troubleshooting.
Select Reset Bank Statement Data and press Enter.
In the Reset Bank Statement Data screen, select the Bank Ledger.
Choose whether to retain reconciliation status or not:
Yes: Retain the reconciliation status for fully reconciled transactions. Partial transactions will be marked as Unreconciled.
No: Clears the data, including reconciliation statuses.
Set the From and To dates for the reset period.
Choose to backup your Company data if necessary, specifying a folder path.
Press Y to confirm and clear the bank statement data.
Get Bank Balance
With Connected Banking, you can easily retrieve your bank balance directly from TallyPrime in just seconds. This feature helps you decide which account to use for supplier payments and ensures you have the information at your fingertips for effective financial management.
To get the balance of your bank accounts, follow these steps:
Press Alt+Z (Exchange) > Get Balance.
Alternatively, press Alt+Z (Exchange) > All Banking Options > Get Balance.
Select one or more bank accounts from which you want to check the balance.
Press B (Get Balance) to fetch the balance.
Troubleshooting Balance Fetching for Multiple Accounts
If you request the balance for multiple bank accounts and the process fails for one or more of them, an Exchange Summary will appear, displaying the issue.
To troubleshoot and compare the fetched balances, you can configure the report by:
Pressing F12 (Configure).
Enabling the options:
Show Bank Name: Yes.
Show Ledger Balance as per Book: Yes.
This will allow you to compare the balance as per the bank with the balance as per your books.
View Additional Bank Balance Details
While viewing your bank balance, you can also check for other details provided by the bank:
Select the bank ledger and press Enter.
The Account Balance Info screen will display additional information.
What More Would You Like in TallyPrime?
TallyPrime 6.0 has introduced Connected Banking and many other powerful features—but we believe in continuous innovation. What enhancements would make your Tally experience even better?
Frequently Asked Questions (FAQs)
An active TallyPrime license
A valid TSS (Tally Software Services) subscription.
A Tally.NET ID or registered email.
A 10-digit mobile number for OTP verification.
Then, log in with your Tally.NET ID, link your mobile number, and follow the on-screen instructions.
Press Alt+Z (Exchange) > All Banking Options > Bank Connections
Log in to Connected Banking (if not already logged in)
Press F6 (New Connection) and select your bank
Follow the instructions to establish a connection on the bank’s portal
Refresh the connection status to confirm it's successfully linked
Press Alt+Z (Exchange) > Get Statement
Set the period and select the bank ledger
Press S (Get Statement) to retrieve the bank statement
Once processed by the bank, import the statement by selecting it and pressing S (Import Statement)
You can instantly fetch your latest bank balance by:
Pressing Alt+Z (Exchange) > Get Balance
Selecting one or more bank accounts
Pressing B (Get Balance) to retrieve the balance from your bank

